
This is the third part of the series and covers creating CouchDB databases for tracking data and for the benchmark app.
- Introduction
- Goals
- Cheap, Fast, Reliable
- Eventual Consistency
- Installation
- Create VM
- Installs
- SSH Security
- Capture VM
- Client Code
- Create Databases
- Create Benchmark/Testing Code
- Create Views
- Start Replication
- Cron Jobs
- Performance Tweaks
- stale=update_after
- CouchDB local.ini mods
- Mapping Data
- Aggregate Heat Map
- Live Map
3. Client Code
This project will allow a user with a web browser to access an HTML document in one database, web, to generate documents in another database, tracking. The databases are separated to maintain security.
- Create Databases – This project will use two databases. One for document storage called tracking and one for the application called web. These instructions will setup all the databases and code on the couch0 server and then replicate the database to couch1.
- Create Users – For this, I really recommend using the user admin tool I built. Despite the shamless self-promotion, a UI for user management just makes life much easier. (https://mark.the-fennells.org/2014/11/12/couchdb-user-manager-app/) For this project, create two users called tracking and web. The tracking user should be assigned to a role called tracking. The web user should be assigned to a role called web.
Tracking Database User Security - Create Databases –
Login to CouchDB as an administrator.
Click the Create Database link in the top left.
Create a database named tracking.
Click the Overview link, followed by the Create Database link.
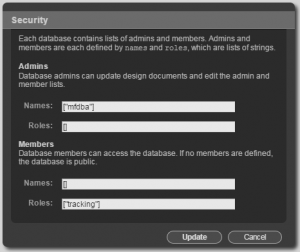
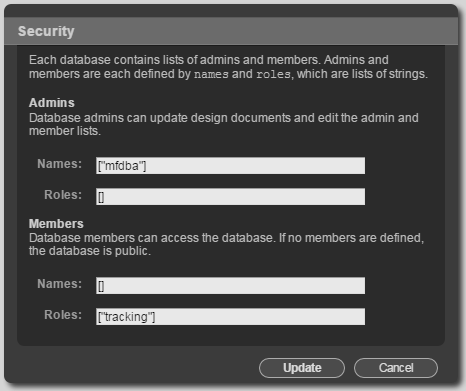
Create a database named web. - While logged in as the admin user, click on the tracking database and follow the Security link. Add the admin user to the list of admin names and the tracking role to the list of member roles. This will allow the tracking user to read and write in the database but requires administrative access to create design documents and administer security on the database.
- While logged in as the admin user, click on the web database and follow the Security link. Add the admin user to the list of admin names.
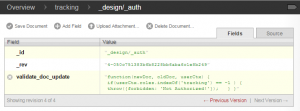
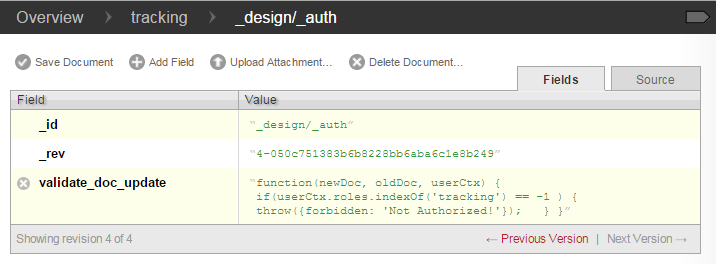
- Next, create a design document in the tracking database with an id of “_design/_auth”. Add a key named validate_doc_update to the document. Give the new key a value similar to the following example to prevent users outside of the given role from writing to the database. The following example, when added to the tracking database, allows only users in the tracking role to write to the database.
Tracking Database Document Security By combining the _design/_auth document with the database security settings, unauthenticated users may access the HTML attachments stored in the web database but will need to be logged in as an administrator or a member of the web role to make any changes to the web database. This will prevent unauthorized documents and changes from being added to the publicly-accessible database.
“validate_doc_update”: “function(newDoc, oldDoc, userCtx) { if (userCtx.roles.indexOf(‘tracking’) == -1 ) { throw({forbidden: ‘Not Authorized!’}); } }”
- Create Users – For this, I really recommend using the user admin tool I built. Despite the shamless self-promotion, a UI for user management just makes life much easier. (https://mark.the-fennells.org/2014/11/12/couchdb-user-manager-app/) For this project, create two users called tracking and web. The tracking user should be assigned to a role called tracking. The web user should be assigned to a role called web.
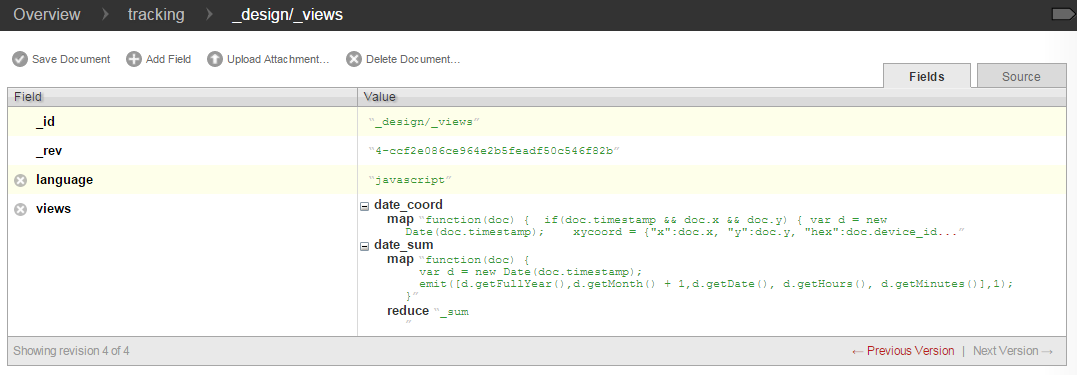
- Create Views in tracking Database – Two views are required for the initial project. One view will be a map-only view of the data to provide a query-friendly format of the date field. The second view will use the same map function but reduce the data to provide a sum of data for a given time slice.

Tracking Database Design Views - The first view will be saved as _design/_views/date_coord and will return all the x, y pairs written per second. This will allow queries for all coordinate pairs for any given time slice ranging from year down to second. The map portion of the view contains the following text.
function(doc) { if(doc.timestamp && doc.x && doc.y) { var d = new Date(doc.timestamp); xycoord = {“x”:doc.x, “y”:doc.y, “hex”:doc.device_id}; emit([d.getFullYear(),d.getMonth() + 1,d.getDate(), d.getHours(), d.getMinutes(), d.getSeconds()], xycoord); }}
- The second view, _design/_views/date_sum, will map each record to a time slice down the minute and then reduce the map by summarizing the count using _sum. The reduce portion of the view only contains the keyword _sum. The map portion of the view contains the following text.
function(doc) { var d = new Date(doc.timestamp); emit([d.getFullYear(),d.getMonth() + 1,d.getDate(), d.getHours(), d.getMinutes()],1); }
- The first view will be saved as _design/_views/date_coord and will return all the x, y pairs written per second. This will allow queries for all coordinate pairs for any given time slice ranging from year down to second. The map portion of the view contains the following text.
- Create Benchmark/Testing Code – Create an html file (see Sample File below) and upload it to a document with the id of performance_benchmark in the web database as an attachment. Accessing this HTML file will populate the tracking database. This combination of database/id/file_name produces the following URL: couch0.cloudapp.net/web/performance_benchmark/couch.html
Sample File: https://mark.the-fennells.org/wp-content/uploads/2015/07/couch.html
The sample file generates random (x,y) coordinates, a device id and timestamp to populate the tracking database. Variations to consider would be using bulkSave instead of saveDoc to populate the database less frequently but with larger quantities of data. Another alternative would be to use javascript gelocation (http://www.w3schools.com/html/html5_geolocation.asp) to populate the database with actual (x,y) coordinates. To view the number of records added per day, access the date_sum view:
http://couch0.cloudapp.net/tracking/_design/_views/_view/date_sum?group_level=3&startkey=[2015,6,17]&stale=update_after
Modify the startkey variable to indicate the start date for the report. The group level corresponds to 1=year, 2=month, 3=day, 4=hour and so on. The stale=update_after allows the report to run without waiting for the view to update. The data in the report will be stale until the view has updated. See the Cron Jobs section below for information on how to keep the views refreshed using curl. As the benchmarking code runs, the database will grow in size and will need regular compaction. See the Cron Jobs section below for information on how to use curl to keep the database as small as possible using compaction. Given the benchmarking code, roughly 1million records will consume about 1GB of disk space without compaction. After compaction, the same 1million rows consumes only 420MB. Without compaction, 10million records can consume 20GB or more. CouchDB also offers file compression using snappy and zlib compression. (http://docs.couchdb.org/en/latest/config/couchdb.html#couchdb/file_compression)
- Replication – CouchDB supports multi-master replication. CouchDB 2.0 promises to make replication more like clustering, but for now, to setup a multi-master cluster would require using a load balancer such as NGinx to forward requests to nodes. However, to keep this exercise simple, the couch0 node will server the purpose of writing data to the tracking database and couch1 will support reading reports from the views. This setup will allow couch0 to focus on writing and compaction and couch1 to focus on keeping the views refreshed. The easiest way to start replication would be to stop couchDB on couch0 and use the Azure Portal to capture the image, stand up a new VM based on the image and use the replication wizard in Futon. However, the following steps will outline the more realistic approach of starting replication on the couchDB server that is already running on the couch1 VM.
- Create the database and users on the couch1 node:
Login to CouchDB as an administrator.
Click the Create Database link in the top left.
Create a database named tracking.
While logged in as the admin user, click on the tracking database and follow the Security link. Add the admin user to the list of admin names and the tracking role to the list of member roles.
Next, create a design document in the tracking database with an id of “_design/_auth”. Add a key named validate_doc_update to the document. Give the new key a value similar to the following example to prevent users outside of the given role from writing to the database. The following example, when added to the tracking database, allows only users in the tracking role to write to the database. By combining the _design/_auth document with the database security settings, unauthenticated users may access the HTML attachments stored in the web database but will need to be logged in as an administrator or a member of the web role to make any changes to the web database. This will prevent unauthorized documents and changes from being added to the publicly-accessible database.“validate_doc_update”: “function(newDoc, oldDoc, userCtx) { if (userCtx.roles.indexOf(‘tracking’) == -1 ) { throw({forbidden: ‘Not Authorized!’}); } }”
- Start replication using curl on the command line. The connection to the target will require an admin userid and password since the validate_doc_update prevents unauthorized users from writing design documents, such as views, which will be replicated.
Initial Replication
curl -H ‘Content-Type: application/json’ -X POST http://couch0.cloudapp.net/_replicate -d ‘ {“source”: “http://tracking:<tracking_password>@couch0.cloudapp.net/tracking”, “target”: “http://<admin_userid>:<admin_password>@couch1.cloudapp.net/tracking”} ‘
After the initial replication, the tracking user can be used to maintain continuous replication.
curl -H ‘Content-Type: application/json’ -X POST http://couch0.cloudapp.net/_replicate -d ‘ {“source”: “http://tracking::<tracking_password>@couch0.cloudapp.net/tracking”, “target”: “http://tracking::<tracking_password>@couch1.cloudapp.net/tracking”, “continuous”: true} ‘
curl -H ‘Content-Type: application/json’ -X POST http://couch1.cloudapp.net/_replicate -d ‘ {“source”: “http://tracking::<tracking_password>@couch1.cloudapp.net/tracking”, “target”: “http://tracking::<tracking_password>@couch0.cloudapp.net/tracking”, “continuous”: true} ‘
For persistent replication that survives reboots, use the _replicator database. (https://gist.github.com/fdmanana/832610)
- Use the Status tool in Futon to monitor the status of the replication.
- Use the benchmark code to populate the tracking database. (http://couch0.cloudapp.net/web/tracking_benchmark/couch.html) With the benchmark code running in two separate web browsers on the same laptop against the A1 level VM, I saw 6,000 to 9,000 records being written per minute. With some tweaking to the benchmark code, performance on an A1 level VM saw up to 20,000 records being writtern per minute with 16 browser sessions writing to the database. To achieve maximum throughput, setting up the tracking database with multi-master replication would allow writing to both servers, thus increasing ingestion capacity. By utilizing multi-master replication and writing to both servers, the benchmark code averaged 15,000 records per minute ingestion equals 250 records per second. Testing revealed a maximum rate of 22,822 per minute. After running for two hours, the average ingestion rate for 16 clients was 20,864 records per minute or roughly 347 records per second or about 21 inserts per client per second.
- Use the date_sum view to monitor progress of the benchmark. http://couch1.cloudapp.net/tracking/_design/_views/_view/date_sum?group_level=5&startkey=[2015,6,17]&stale=update_after
Personally, I find this reporting capability to be phenomenal. CouchDB on these A1-level servers is able to perform record counts nearly instantaneously while records are still being written to the database.
- Create the database and users on the couch1 node:
- Cron Jobs – Scheduled cron jobs can be used to improve performance of the design views and to maintain the size of the tracking database. The schedule should be adjusted to meet the demands of your application. Refreshing views and compacting a database can be resource intensive. However, waiting for a design view to return data will take longer if the views are not refreshed frequently enough. The sample crontab definitions below would refresh the views every minute and run database compaction every 2 hours.
* * * * * /usr/bin/curl -g -v ‘http://<admin>:<password>@couch1.cloudapp.net/tracking/_design/_views/_view/date_sum’ &> /dev/null
* * * * * /usr/bin/curl -g -v ‘http://<admin>:<password>@couch1.cloudapp.net/tracking/_design/_views/_view/date_coord’ &> /dev/null
0 */2 * * * /usr/bin/curl -g -v -H “Content-Type: application/json” -X POST ‘http://<admin>:<password>@couch1.cloudapp.net/tracking/_compact’ &> /dev/null
Leave a Reply
You must be logged in to post a comment.